You have 0 items in your cart
How to Make Homemade Ravioli
October 5, 2011
This post may contain affiliate sales links. Please read my disclosure policy.

The other day on Twitter and Facebook, I had a little conversation with you all about making homemade ravioli. I asked “would you make raviolis from scratch?” to which many of you responded yes! So, after scouring the internet for the right recipe for pasta dough, I got to work and made some seriously killer ravioli. Yeah, KILLER! These were so delicious, especially considering this was my 1st attempt without any special gadgets or gizmos.
Yeah, that’s right! I made these with no special tools or equipment! {I inherited a ravioli stamp from my Grandma…does that count?}
Some may say I’m crazy for even thinking to attempt making these with no special machine or pasta maker. In an ideal world, I would have all the bells and whistles I need to make these babies with little to no hassle. However, if I don’t have most of the tools, odds are YOU don’t have most of the tools. And if I were to post such a recipe, it would be fun to read but completely impractical to you.
Therefore, I opted for the old school method. One which anyone can do! I promise it’s very do-able. You just need a good chunk of time because it’s time consuming.
Hard? Not really.
Worth it? Totally.
So, here we go:
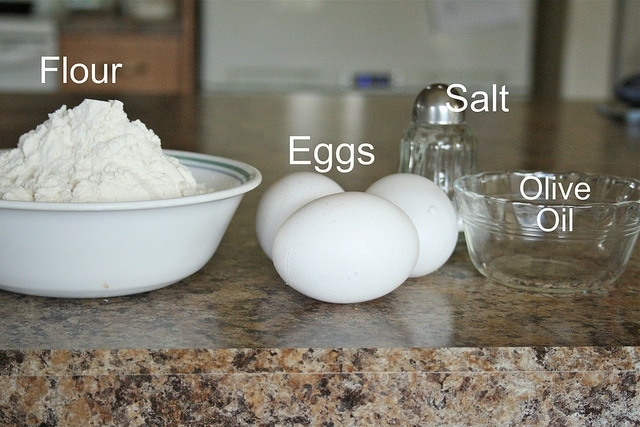
To get started, you’re going to need some simple basic ingredients: flour, eggs, salt and oil. Easy enough, right? {Just fyi my pasta and filling looks a little on the yellow side because I use farm fresh eggs. Don’t adjust your screens!}
Dump the flour onto a clean work surface like your kitchen counter and make a well in the center.
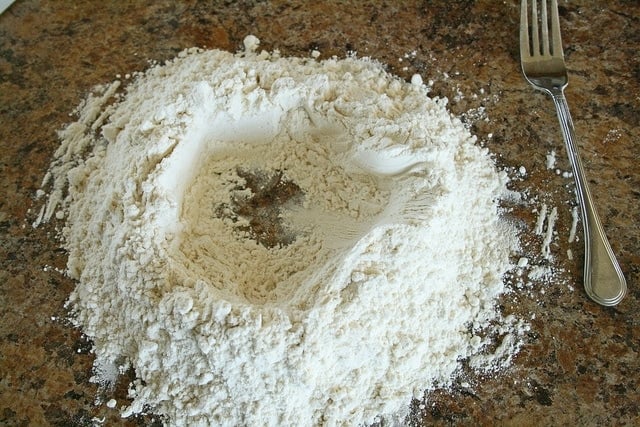
Crack in your eggs and add the salt and oil too, while you’re at it.

Then using a fork, start beating away! Start in the center by scrambled the eggs and then slowly started taking flour from the sides and incorporating that to make your pasta dough. At first it looks like a big fat mess…

…but then as you keep going it starts to slowly come together and form a dough.

Once you can’t mix with a fork anymore, it’s time to start using your hands. Things at this point were still quite sticky, so I had some flour nearby that I kept sprinkling over top.

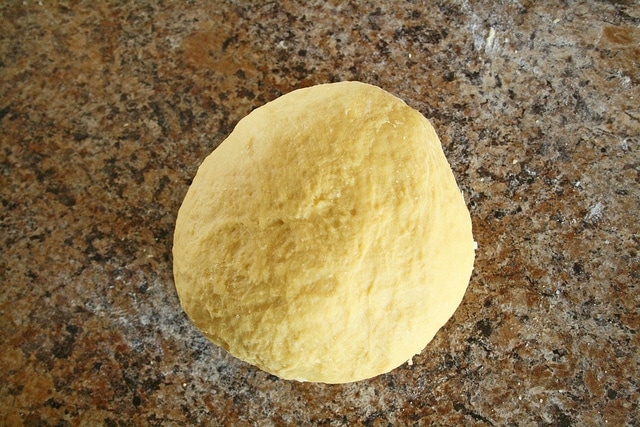
So, once it’s not too sticky, it’s time to knead this bad boy until it’s smooth and elastic-like. I still had to sprinkle in the occasional flour, but for the most part it was fine to work with.

This is what mine looked like after 10 minutes.
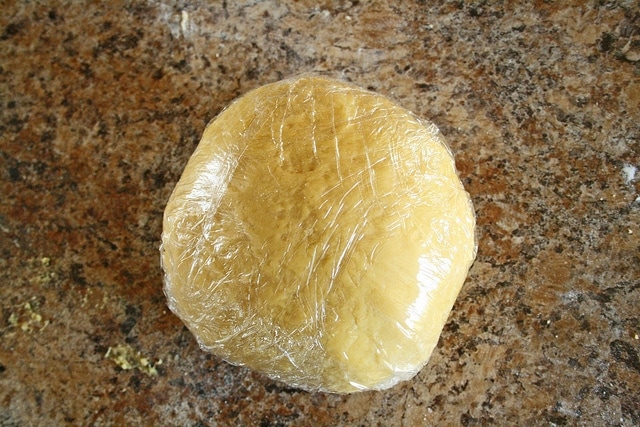
Wrap up the dough in plastic wrap and set aside for 20-30 minutes to rest.
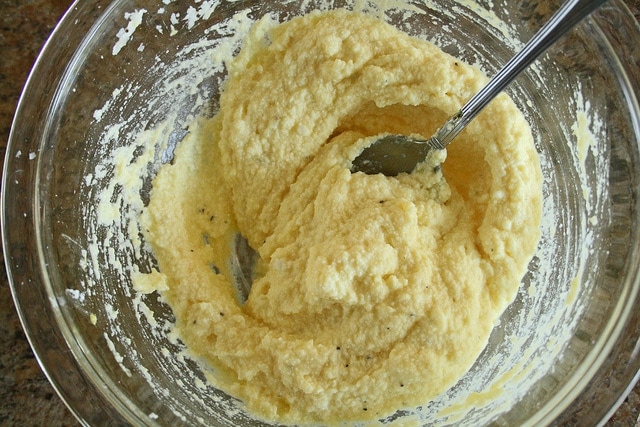
In the mean time, you can make some fillings. Pictured below is an easy parmesan and ricotta filling, but I posted a recipe for a butternut squash filling below as well. Basically, you just throw all your ingredients into a bowl…
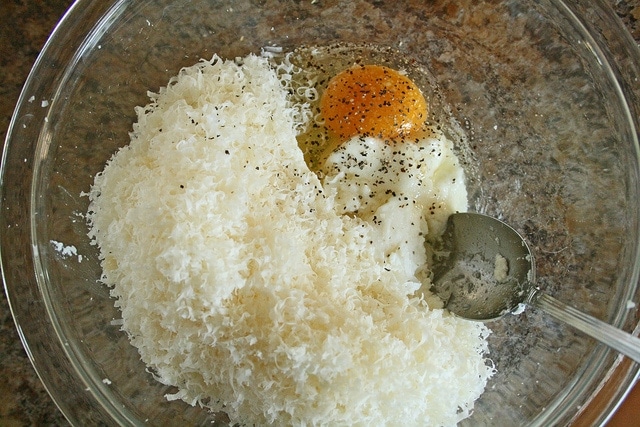
…and stir it all together, like so. Seriously one of the easiest fillings ever. Set this aside.
Now, lets move onto the main event! This is a ravioli stamp. It will seal the edges for you and make some adorable little ravioli babies!

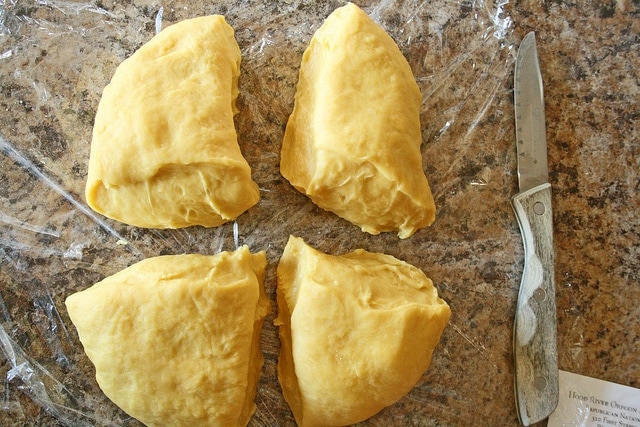
To make ravioli, unwrap that dough you just made.

I cut my dough into fourths so it was easier to work with. Do what your little heart desires. I just thought fourths made sense.
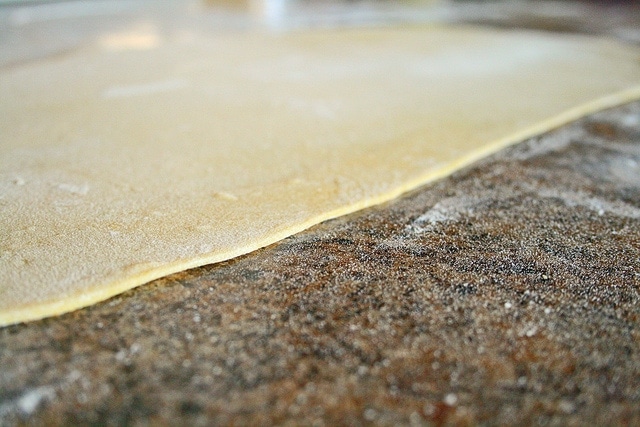
Now comes the exciting part. Flour your board, your dough and your rolling pin. Roll your dough into a very thin rectangle. You want the dough as thin as possible. And, you want to keep the dough moving as you roll so it doesn’t stick!
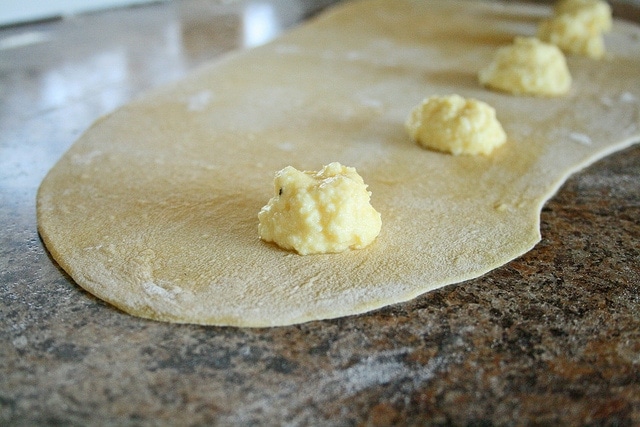
Once you have the dough all rolled out, place dollops of the filling on the dough. The amount and distance between the dollops will vary, depending on how big or small your ravioli stamp is.
Next, fold the top part of the dough over the filling.

And then press the top piece of dough around the filling to get rid of any air pockets. Air pockets aren’t good.

Ok, here’s the fun part! Take your stamp, dip it in a little flour and line it up with your lump of filling.
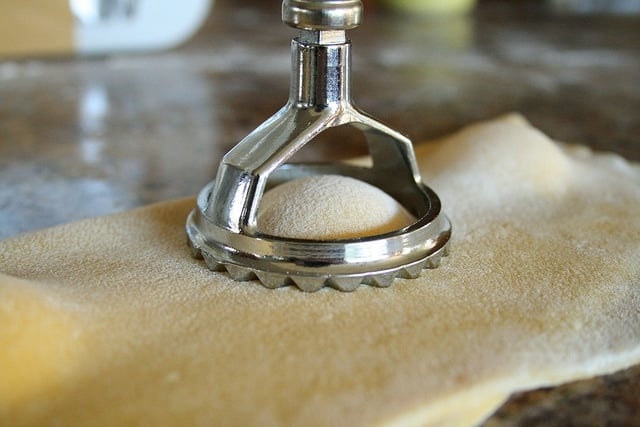
Now, push down really hard!

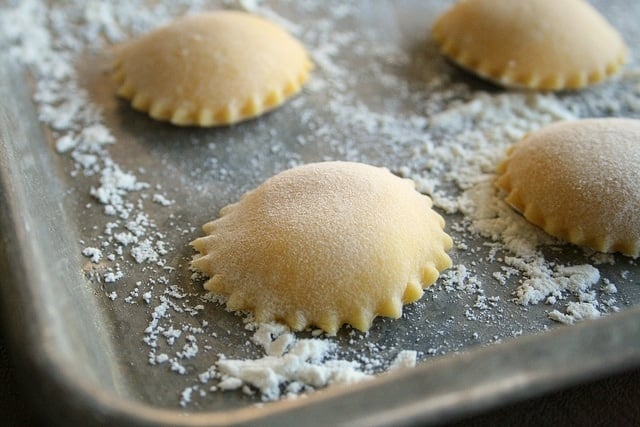
And voila! Cute little raviolis!

Place them on a floured baking sheet and continue this process until there is no more dough and/or filling left. At this point, you can put your sheets of ravioli into the freezer for 24 hours and transfer to a freezer bag for a quick meal later in the month.
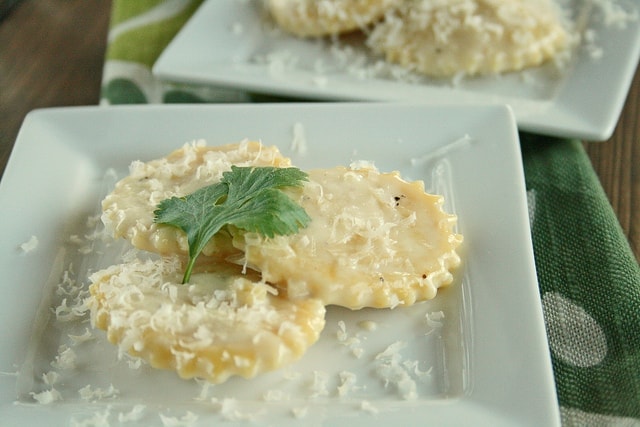
OR, you can boil some up right away and make a quick garlic cream sauce to go with! Super easy and super delicious! That garlic cream sauce is practically the same sauce from this recipe fyi.
So, there you have it! Hope you all can find the time to try these out one day! They are worth the wait! Happy Wednesday!
More Ravioli Recipes to Try!
How to Make Homemade Ravioli
Learn how to make Homeade Ravioli filled with tender cheese to make pasta night extra special. It's a lot easier than you think it is!
Ingredients
For the Fresh Pasta Dough-{recipe taken from Kelsey Nixon}
- 2 cups all purpose flour
- 3 eggs
- 1/2 teaspoon salt
- 1/2 teaspoon extra virgin olive oil
For the Cheese Filling-
- 1 cup ricotta cheese
- 1/8 pound finely grated parmegianno reggiano cheese
- 1 egg
- salt & pepper to taste
For the Garlic Cream Sauce-
- cream
- butter
- finely minced
- garlic
- finely grated parmeggiano reggiano cheese
For Butternut Squash Filling-
- 1 1/2 pound butternut squash peeled and cubed
- 2-3 cups chicken stock or vegetable broth
- 2 tablespoons butter
- 1/2 cup chopped onion
- 2 cloves garlic
- 2 pinches ground thyme
- 1/4 cup ricotta cheese
- 1 egg
- salt & pepper to taste
Instructions
- Mound the flour on a clean work surface, like a large cutting board or counter. Using a fork, create a well in the middle of the flour with high sides.
- Crack the eggs into the well. Add in salt and oil. Using a fork, beat the eggs and slowly incorporate the flour by pulling it in from the sides of the well. As you continue to pull more flour and mix, the dough will start coming together.
- Using your hands, the fork or a bench scraper, work the dough until it comes together. Add more flour if it is sticky, add a few splashes of water if it is too dry.
- Knead the dough for 8-10 minutes until smooth and elastic. Wrap the dough in plastic wrap and set aside for 20 minutes or so.
- While pasta is resting, make the cheese filling by stirring all ingredients together into a bowl. Set aside.
- Sprinkle a baking sheet with flour and set aside.
- Unwrap pasta and cut into four sections. You will work with one section at a time. Wrap the remaining three up in plastic in the mean time. Flour your work surface liberally. Roll out dough with a floured rolling pin, working from the middle and rolling out. Try to get the thinnest and longest piece of dough you can. Keep rotating and turning the dough to prevent sticking. Once your dough is rolled very thin, place a small amounts of the filling {about a teaspoon} onto the dough about 1 1/2-2 inches apart. {Your filling amount and spacing will depend on how large or small your ravioli stamp is! Try your best not to overfill! It might take a few tries to figure out the perfect amount.} Fold the top of the dough over the filling. Press the top piece of dough over and around the filling to remove any air bubbles. Press your ravioli stamp in flour and then press down firmly to cut out raviolis. Place on prepared floured tray. Form the leftover dough into a ball and place in the plastic wrap to rest. Continue this pattern until all the raviolis are filled and cut out.
- At this point you can place your trays of raviolis in the freezer for 24 hours and then transfer to plastic freezer bags for a quick meal.
- To cook, bring a large pot of salted water to boil. Drop in your raviolis and stir gently. Raviolis will be finished cooking once they float to the top. Drain and pour back into the hot pot. Place on the warm burner. {You don’t need the burner on!}
- To make a simple garlic cream sauce, melt some butter in with the hot raviolis {still in the same pot you used to cook them in}. Grate in a little garlic, a splash of cream, some grated parmesan cheese, salt and pepper. Stir for a minute or two or until sauce thickens slightly. Serve immediately. {For about 12 raviolis, I used 2 tablespoons butter, 1/2 large clove of garlic, 1/4 cup cream, 1/2 cup cheese, salt and pepper.}
- To make the butternut squash filling, place cubed squash into a large pot with chicken stock. Bring to boil. Reduce to simmer until squash is soft. Drain.
- While squash is cooking, melt butter in a large skillet over medium heat. Saute onions until tender, 7 minutes. Reduce heat and add in garlic. Cook 1 minute and remove from heat.
- Place cooked squash, onions, garlic, and remaining ingredients into a food processor. Puree. Store in refrigerator until ready to fill raviolis.
Nutrition
Calories: 454kcal | Carbohydrates: 52g | Protein: 21g | Fat: 18g | Saturated Fat: 10g | Cholesterol: 181mg | Sodium: 594mg | Potassium: 660mg | Fiber: 4g | Sugar: 5g | Vitamin A: 12683IU | Vitamin C: 25mg | Calcium: 313mg | Iron: 4mg


Just as my grandmother made ravioli. The only additional step she took was to lightly press the ravioli press on the bottom piece of dough before adding the ricotta. She was able to perfectly Center the filling and minimize extra dough around the raviolis. Thank you for posting this!
I found a ravioli press for $5.50 here: http://www.gygi.com/2-round-ravioli-stamp.html
If you are local to Salt Lake, you can pick it up in store, too.
I just made this with my seven year old daughter. It’s the second recipe that we’ve tried. This dough rolled out much thinner, which was really helpful. My wife made a marinara while we made the ravioli. They were delicious. We didn’t have a ravioli press, but a glass worked fine with a little fork work after. Next time, if my daughter is stirring, I might use a bowl instead of the flour volcano on the table. It was messy when the eggs overfilled the flour. But that was fun too. Thanks for the great recipe. My daughter is always asking to make ravioli from scratch.
I’m pretty sure you can use a fork too, rather than a ravioli press
[…] followed this tutorial, written on the blog Lauren’s Latest, on how to make homemade ravioli from scratch. The […]
Hi Lauren! A few questions I have are: (1) How much time would it take to prepare this meal by using a glass instead of a ravioli press? (2) Does the table get sticky from mixing the eggs and flour on it? (3) Will whole wheat flour be okay to use? (4) How many hungry Italians would this serve??
What kind of flour did you use? I’ve seen that there is a 00 (double zero) flour that is supposed to be very good for pasta.
Thinking of giving these a try!!!!!!!
just all purpose flour from what I remember.
by six servings, how many ravioli would that make?? I plan on making a super awesome Valentine’s day dinner and with a boyfriend who will be coming home from a hard day at work, he will probably eat more than one serving…
Please let me know!
It should be more than enough for you two! I don’t have an exact number of raviolis it would make, but it’s plenty.
hi… what do you do with the leftover dough after you have cut out your circles…. mine get very dry when i run them back into the machine to make flat… please help so i dont have to toss my dry dough!
add a few sprinkles of water…should come right back together.
I was so excited to find this. I have been trying to decide what to do for Valentine’s dinner that will excite my kiddos. I’m going to use a heart-shaped cookie cutter and see how that works out for me! 🙂
Thank you for this great tutorial! This will be my first time making pasta, I was nervous but now I think I can do it. I was wondering if a red sauce would taste good with your cheese filling, if so what would you recommend? Also, do I have to buy a block of Parmesan cheese or can can I buy some already grated, if so how much should I buy? Thank you!
I’ve been wanting to try this for awhile. Your tutorial is very well done and I’m sure my family will appreciate Dad’s latest kitchen adventure. Going for a crab, prosciutto, and Parmesan filling with a creamy Alfredo sauce !!
Myn came out hard, what did I do wrong
Cook them a few minutes longer. Make extras so you can samplecas they cook. Everybody says they’re done in 3 mins..when they float..etc. in my case thats not true. They take 7-9 min..so just check as you go.
I going to try and make this today. I was wondering if you can bake these instead of boiling? If so how long would you bake them and what temp? Thanks
I wouldn’t bake these! It would make them dry and chewy. Boil them! It only takes 3 minutes to cook in hot water.
[…] How to Make Ravioli from Scratch […]
Trying this tomorrow! but im just going to fold the rav’s by hand and use a fork to close them. hope everything comes out as good as it looks!
I just saw jamie oliver on tv this morning and he made tortellini using a pretty similar recipe for the dough. That could be an option to fold the dough up if someone doesn’t have a ravioli press.
Just wanted to say I tried making your recipe today with a spinach/ricotta filling and it was amazing! I had no idea I could make ravioli at home and your recipe laid it out so simply and the pictures were super helpful. Thanks!!
Hi! Do you think it would be ok to use a pizza cutter for the ravis? Also, I might have missed it, but how many raviolis (appx) does the dough recipe make?
[…] sauce or springled with fresh grated Parmigiano-Reggiano. If you do decide to make these cheesy Ravioli just be sure to invite me over for dinner […]
Wow! I am SUPER impressed by your flawless ravioli! I want to make this!!!
Aww, thanks Jolene!
Recently I saw a recipe for homemade butternut ravioli that I wanted to make but it looked like waay too much work. However, after making homemade bread and trying your yummy pizza dough, I think I’m ready to attempt the ravoli. You make it look so easy – thank you!
These are lovely! I need to try this soon.
The ravioli looks like you’ve been doing it for years. How fun to inherit a ravioli press.
I sort of wish my Grandma hadn’t died in order for me to inherit it, but glad to get something from her kitchen!
Oh we love homemade ravioli but I rarely make it as the guys will eat an entire batch (or double batch) in one sitting! They know it is truly an act of love when mom makes homemade ravioli! Have you tried any meat fillings? I am looking for a new one that does not have turkey or chicken in it…. I have one right now but am hoping to find a better one. I’ll have to try the butternut squash recipe… it sound DELICIOUS!!
Oh how frustrating! It really is such a time consuming task! Glad they all appreciated it!
Great photos!! I would love to try this someday…you made it seem a [little] less scary. 🙂
Oh good! That was my intention.
Great tutorial!
Homemade ravioli sounds like such an intimidating thing, but this makes it look totally doable! Definitely adding this to my to-make list soon! 🙂
I hope you do make these! They were super yummy!
Nice work, Lauren! I love this! I’m picturing you as a traditional Italian grandmother right now. Hey, have you put on a few extra pounds? 😉
P.S. TWO MORE SLEEPS. [eeeeeeeeeeee!]
I’m no Grandma! And, yes I have put on an extra 5 pounds…thanks for pointing that out! Lol!
As in response to Carly asking if you put on a few extra pounds…..I smell a ‘green-eyed monster’ @carlyklock…..wow! Lauren is a confident individual who shares her gifts with the world without hesitation. @carlyklock you need a class in manners, confidence, & self-esteem.
THANKS LAUREN! Your site is a wonderful sanctuary for those of us who appreciate creativity & individuality. 🙂
People already think I’m strange for baking my own bread, biscuits, and pie dough. Can’t wait to hear what they say when I make my own ravioli.
This looks amazing and so easy! 🙂
Wow! You are amazing. Only sometimes to I make EVERYTHING from scratch. It’s so much work!
Great tutorial – thanks – now I’m really going to have to try this myself! 🙂
Yep. I just died. And entered ravioli heaven.
It’s nice here.
Yeah, it’s a nice place to be!
Where does one purchase a ravioli press, if one’s grandmother doesn’t hand one down?
Or could I just use a cup?
Any kitchen supply store should have one. They are under $10, so totally reasonable. Here’s one from amazon: http://astore.amazon.com/golkit-20/detail/B000NDQIKA
No need to purchase a ravioli press. You can do it the way my grandmother taught me how to do it. Take a small 2 to 3 in water glass and dip it in flour, then press it into the dough. With a twisting motion you will have cut out a circle of dough. Then grab a table fork, dip it in the flour and gently press the edge of the fork tines into the dough sealing it! It is a little slower than a stor bought press but works just fine.